Introduction
Firstly, this painting was very much an experiment for me so, I would title this more of a "process" than a tutorial, a look into what making this artwork consisted of. Failing is a massive part of my learning process 😂 Below is the image this painting was based on, you can click on it to be taken to the Public Domain Archive where it is hosted: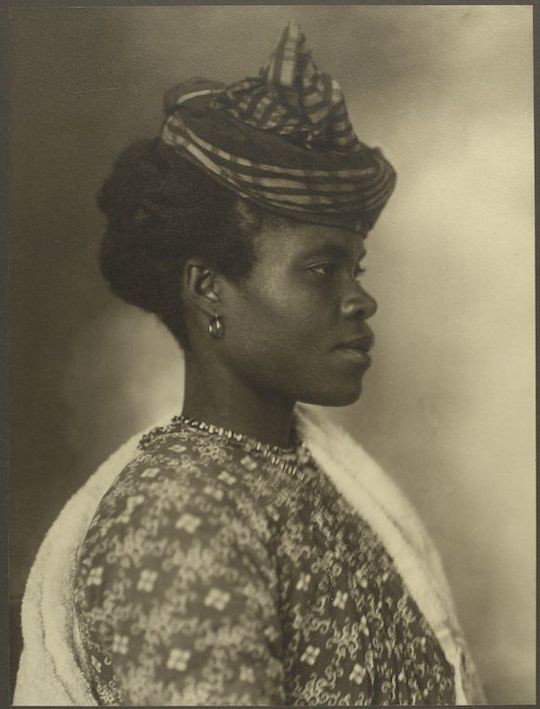 I chose to find a reference from the PDA because it's a really cool place to find older references and the purpose of my painting today was to try and do a realistic portrait in a classical style. By classical style I mean that today (I'm writing this before I start painting) I wanted to try and mimic the Flemish painter's approach.
The woman in this photo's dignified pose and beautiful profile made her the perfect subject.
I chose to find a reference from the PDA because it's a really cool place to find older references and the purpose of my painting today was to try and do a realistic portrait in a classical style. By classical style I mean that today (I'm writing this before I start painting) I wanted to try and mimic the Flemish painter's approach.
The woman in this photo's dignified pose and beautiful profile made her the perfect subject.
Canvas Preparation
The canvas I am painting on today is a 12" by 16" Monte Marte canvas board. I'm sure my fellow Australians are familiar with the brand, it is very affordable and readily available where I live at most dollar stores and the like. Without a few extra steps to prepare these boards they can be fine to paint on with acrylics but with oils in my experience the paint sinks right in, resulting in a very dull painting. This is an experiment in a way because I'm still testing different methods of preparing canvas but I'm very happy with the result this time.To prepare my canvas for this painting I needed:
- Chromacryl Gesso
- A resin paint scraper
- The finest grit sandpaper block I could find.
- A face mask.
 I prepped it a few days before I started painting but next time I will try to remember to document that process, however it's quite simple and there is a lot of good video tutorials online. You will find that the preferred method for preparing canvas varies between artists so it's a good idea to experiment. For transforming a cheap canvas into a smooth surface this has been the best method I've tried yet.
Firstly, I placed 2 pieces of blue tack onto the back of my canvas board, this kept it in place as I scraped gesso across the surface. Then, with a pallete knife, I scooped a generous amount of gesso onto the board. After that, I scraped the gesso across the surface from top to bottom and side to side, doing my best to cover the edges without missing any spots. After a few hours I applied another coat and once it was dry I put on a face mask and lightly sanded the surface. Inhaling acrylic dust is absolutely terrible for your lungs and nose.
I prepped it a few days before I started painting but next time I will try to remember to document that process, however it's quite simple and there is a lot of good video tutorials online. You will find that the preferred method for preparing canvas varies between artists so it's a good idea to experiment. For transforming a cheap canvas into a smooth surface this has been the best method I've tried yet.
Firstly, I placed 2 pieces of blue tack onto the back of my canvas board, this kept it in place as I scraped gesso across the surface. Then, with a pallete knife, I scooped a generous amount of gesso onto the board. After that, I scraped the gesso across the surface from top to bottom and side to side, doing my best to cover the edges without missing any spots. After a few hours I applied another coat and once it was dry I put on a face mask and lightly sanded the surface. Inhaling acrylic dust is absolutely terrible for your lungs and nose.
Image Transfer
Something I didn't do for many, many years was tracing. Artists who've grown up on the internet will know that tracing has been a very taboo subject for a long time in online art spaces. I think I understand why, young artists are very protective of their work, especially during the height of the DeviantArt days and that eventually manifested into a paranoia about tracing anything, even photos to aid in your art. However, art history will teach you that using methods to transfer a scene from life to a drawing surface is nothing new.All that is to say, for an assortment of reasons I didn't really want the added challenge of doing a perfect one to one drawing for this painting so I digitally traced the photo.
Step 1:
I opened the photo in my prefered software (Clip Studio) and created 2 layers, the layer above the photo I filled with white and set to 70% opacity. On the top layer I traced the photo, it doesnt have to look good you just want the placement of the features. I then turn the opacity of the white layer all the way up and made sure the dimensions of the image matched the dimensions of my canvas before printing.
The process for printing out a tiled image like in the image below varies from printer to printer, but like this you can print an A3 drawing with a regular A4 printer.
Step 2:
The next step required a light board but you can save yourself a lot of time by using carbon paper in which case you won't need a light board. I'm all about saving money at the moment so I switched on my lightboard, flipped the print out over after I cut and paste it together and started scribbling along the lines.
Once all the lines were covered in lead I flipped the print out back over and taped it to my canvas along the top so I could lift the print outt and check the lines as I traced the outline with a pointy ballpoint pen.


